
The controller is going to be how we interact and control Roboty so I wanted to tackle this challenge early on in the project. The controller will connect to the Raspberry Pi using Bluetooth and allow us to control acceleration, braking, and steering. The pressure sensitive controller trigger buttons will allow us to control the acceleration and speed and the multi-position analog stick will allow for very precise steering. The controller will also allow us to control various features such as enabling or disabling voice control, toggling on and off the camera, gracefully shutting down the Raspberry Pi, and of course honking the horn! We also plan to use the right analog stick to control the claw and missile launcher for the Feed the Fish and Tidy Up the Toys challenges.
Roboty’s current controller is just a basic website running on the Raspberry Pi and we access it over Wi-Fi from an iPad or the computer. There are buttons to go forwards, go backwards, stop, and steer. You can also set one of three speeds: slow, medium, or fast. This was our first attempt at a way to control Roboty and it worked okay but it wasn’t very responsive. Sometimes it took several seconds to response to a button press and by that time, you’ve missed your turn or crashed into a wall. Time to setup a better controller.

We have a Nintendo Switch Pro controller and a few Sony PlayStation 3 controllers. There doesn’t seem to be much support for the Switch Pro controller so I decided to go with the PS3 controller for now. I did some research on Python input libraries which will allow us to capture button presses and the positions of our trigger buttons and analog sticks from the controller. I had heard about Pygame before so I read some documentation about it and I also came across the Python “Inputs” module.
I decided to make my first Discord post to the PiWars server to ask for recommendations on controllers and input libraries. I received several responses from other participants with some great suggestions. One person suggested the Approximate Engineering – Input (approxeng.input) library so I read through the documentation and it looked perfect for what we needed!

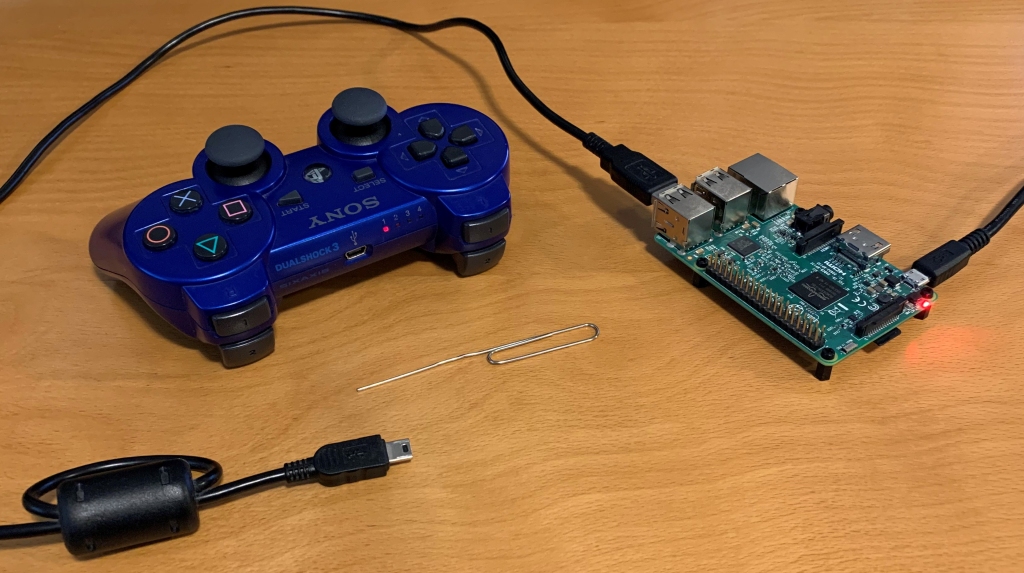
The first thing I did was connect the PS3 controller to the Raspberry Pi using Bluetooth. Several people mentioned that it can be a pain to pair the PS3 controller with the Pi but I didn’t have too much trouble with it. From the Raspberry Pi command line, I issued the following commands to start the Bluetooth configuration tool, turn on the default agent, and then start a scan for new Bluetooth devices.
sudo bluetoothctl
agent on
default-agent
scan on
Once the Raspberry Pi started scanning for Bluetooth devices, I had a bunch of different devices and MAC addresses fill up the screen. The instructions from several websites suggested pressing the PlayStation button at this point. I tried that but didn’t see any PlayStation controller devices show up. I decided to connect the PS3 controller to the Raspberry Pi directly using the USB cable and as soon as I did, the device showed up in the list.

The four lights on the top of the controller were also now blinking. I copied down the MAC address of my PS3 controller and with the cable still connected, I issued the following command to “trust” the device.
trust 38:C0:96:8D:FF:5E
Next, I unplugged the USB cable from the controller and then I pressed the PlayStation button. The “player 1” light on the top of the controller came on and my PS3 controller was connected to the Raspberry Pi over Bluetooth!
With the PS3 controller connected to the Pi, I wrote a little Python program with the approxeng.input library to read a few button presses from the controller. The approxeng.input library is really easy to use and has some great documentation and samples. Here is the test program I made.
import time
from approxeng.input.selectbinder import ControllerResource

try:
	with ControllerResource() as controller:
		print("PS3 DualShock 3 Controller Found!\n")

		while controller.connected:
			# Query for button presses
			controller.check_presses()

			# Check if the Cross button was pressed
			if controller.presses.cross:
				print (">> Cross: \tPressed")

			# Check if the Square button was pressed
			if controller.presses.square:
				print (">> Square: \tPressed")

			# Check if the Triangle button was pressed
			if controller.presses.triangle:
				print (">> Triangle: \tPressed")

			# Check if the Circle button was pressed
			if controller.presses.circle:
				print (">> Circle: \tPressed")

			# Check if the Home button was pressed
			if controller.presses.home:
				print (">> Home: \tExit")
				break

			# Quick pause
			time.sleep(0.01)

except IOError:
	print("Connect the controller and try again...")
I spent the next few hours writing the code to map each button to an action. For most buttons, I just printed out what the button will do, such as “Brake” or “Brake Released” for the L2 Trigger or “Voice Commands Disabled” and “Voice Commands Enabled” for the DPad Left button. This allowed me to test all of the buttons, display which action they will perform, and have a place holder in the code for later on when we work on the action or function. Here is a screenshot of some button testing and the corresponding action for each button.

I did have a few challenges throughout the day. When I was testing the left analog stick, the reported x-axis position was not very accurate. Without even touching the left analog stick, if I picked up or moved the controller, the reported value would jump all over the place. I tried a second controller and it had the same issue. The right analog stick seemed fine – I could easily move it to the left or right and capture a very precise x-axis position. I decided to take one of the controllers apart and clean all of the buttons, contacts, and analog sticks. I put it back together and then both analog sticks didn’t work at all. Oops! So I took it all apart again, fixed my mistake with the analog stick ribbon circuit board and then put it back together. The analog sticks worked again but the left one still had the same issue. Maybe the left analog sticks are just worn out. I did play A LOT of GTA V back in the day! For now, we’ll have to use the right analog stick to steer and maybe look into getting a PS4 or Xbox controller in the future.
The second issue was while I was testing my code with the controller button presses. My PuTTY session would randomly freeze and become unresponsive or the button presses wouldn’t be printed to the screen for several seconds and then all appear at once. Several times, I had to reboot the Pi completely. I had a hunch that our Adafruit DC Motor HAT was interfering with the WiFi and Bluetooth signal so I removed it and that ended up solving the problem! It was handy having the HAT directly on top of the Pi because it saved space and we didn’t have to run any wires from the Pi to the motor HAT. I guess we’ll have to find a new spot for it on the chassis.

No Aiden for this one – he had school. I took the day off from work so I could work on this!
